How to Remove A Virus That Does Not Allow To Run Virus Scan?
When the virus has infected the computer so badly that you are not able to run a virus scan, there are still methods to remove the virus. In this post we will share one such useful trick.
Fix:
The solution to fix such virus is that fix the virus using a boot CD with virus scanner tool. Using a boot CD, the computer will boot using the CD, thus the virus will not load into the memory and will not be able to kill the anti-virus.
Steps to use the Kaspersky Rescue Boot CD:
1. Download the Boot CD image called Kaspersky Rescue CD on some other computer which is not infected. Link is given at the bottom of this article.
2. Burn a CD using this CD image on the computer where you download the image file. You can use Nero or In Built Image burning tool of Windows 7 or any other image burning tool for this. Now use this CD to boot the infected computer.
3. Boot the infected computer using this CD. If the computer does not boot with this CD, press delete when computer starts, open BIOS setup and set the Boot order for the devices.


Additional to Virus scan, you can also delete a file if your are sure that its causing problems. For deleting a file, you can use the red icon at the bottom of the screen which is a menu and will give you an option to run “File Manager” which gives you access to all your hard disk drive partitions.
Websites Asks To Press F1 Key ? DON’T PRESS IT
Microsoft has been reported of a vulnerability discovered in Windows operating systems Windows XP, Windows 2000 and Windows Server 2003 which exploits the VB Script. Microsoft has recently released an Advisory named “Microsoft Security Advisory (981169)”
As per the advisory there is a vulnerability that if a user presses F1 Key on being asked by a Website or webpage, the website can run potentially malicious code or scrip on such computers. That computer can get hacked, information can be stolen or it may also lead to data theft.
It is an advice to all our readers and Windows XP, Windows 2002 and Windows 2003 Server users to beware of this vulnerability and do not press the F1 Key when asked by a website. This may leave your computer unsecured or infected with virus or trojans.
How To Solve "There Are No Active Mixer
Devices Available" Error Message in Windows?
Solution 1:
Go to Start > Run and type in: services.msc , and hit enter.Scroll down to "Windows Audio", right-click on it and select Properties, set the startup type to Automatic, click Apply and then click the Start button.
Solution 2:
Computer was giving the error “no active mixer devices available” whenever they clicked on the volume icon in their task bar. This problem came up out of nowhere and it was almost of if the computer never had sound before! In the Sound and Audio Devices applet in Control Panel, everything was grayed out and there was a message saying “No audio device” under the Volume tab
Computer was giving the error “no active mixer devices available” whenever they clicked on the volume icon in their task bar. This problem came up out of nowhere and it was almost of if the computer never had sound before! In the Sound and Audio Devices applet in Control Panel, everything was grayed out and there was a message saying “No audio device” under the Volume tab
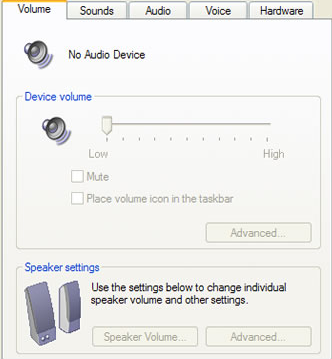 Upon checking under the Hardware section via the System Properties, we found a couple of yellow exclamation points next to Multimedia Audio Controller. Now this issue would have been easy to fix if the computer had a separate sound card installed and would have simply involved downloading and re-installing the latest drive for the card. Sometimes the driver becomes corrupt and the sound disappears. In this case, just go to Dell, HP, or your manufacture’s web site and download the audio drivers.
However, if your sound card is integrated into your motherboard, you’ll have to re-install the motherboard sound drivers. This is a little trickier because you need to first find the make and model of your motherboard. You can figure out the model of your motherboard in three ways:
1. Open the computer and find the sticker or embedded name of the manufacturer. Be sure it’s not the maker of the chipset, as that will not help.
2. Everest software – a free app that will help you identify your motherboard.
3. Belarc Advisor – Another nifty little app that will give you a crap load of information about your computer including the motherboard.
Once you have the model information, you’ll need to perform a search for the number or try to go to the web site of the maker. Find your driver, install it and restart the computer. You should now have your sound back!
Any questions, post a comment!
How To Apply Restrictions And Prevent Users From Changing Files On Your Hard Drive – SteadyState?
How can we revert all the changes made by user after the user log off or system restart, this is quite a custom requirement when the you want to remove all the changes being made to your computer made by your cousin or any other user who had used your computer once in a while may just for playing games. Removing all the changes made by the user will remove all the created files by that user and software being installed by the user, you can more over apply certain restrictions also on the users using your computer, all this can be achieved by a free utility by Microsoft called Steady State
How To Delete/Remove Khatra.exe/Xplorer.exe/gHost.exe Virus from Your Computer?
This virus has some symptoms when ever you try to open browser and search remove khatra.exe the browser will automatically close, you can’t not delete khatra.exe or gHost.exe or Xplorer.exe which are created by the same virus as these processes will keep running.
Let’s discuss the removal procedure to delete khatra.exe or gHost.exe or Xplorer.exe virus
Fix:
Follow the procedure below
1. Open Task Manager but if task manager is blocked then unblock task manager and click the process tab, found these process
Windows Explorer.exe Does Not Load\Run
This type of problem occurs when your computer get infected from the virus or spyware which has corrupted some registry keys which are related to explorer load.
Here is how you can fix this issue:
Fix:
Follow the procedure below
1. Press Ctrl+Shift+Esc to launch task manager
2. Click File | New Task
3. Now type regedit and click Ok
4. Browse the following registry path
Cannot Uninstall Yahoo Messenger
There can be different reasons for different people for which they want to uninstall yahoo messenger on their computers. Some common reasons are mentioned given below:
* You cannot log on to yahoo messenger installed.
* Messenger does not start because of damaged or corrupted installation files.
* You may want to upgrade to the latest version of Yahoo Messenger.
* You cannot send and receive messages.
* It is degrading system performance.
* you are using some other messenger for online chatting.
Here is how to fix all the issues faced and completely remove and delete yahoo messenger from your computer.
Close All Running Programs
When you give the command to shutdown Windows, the shutdown process first closes down all applications and processes running on it and then shuts down itself. Therefore, if your system is slow in shutting down, it is recommended that you first close all programs running on the computer and displayed in the system tray and then give the shutdown command.
Resolve Problems Related to Buggy and Outdated Drivers
Buggy and outdated device drivers may also cause problems during system shutdown. To see if there are problems with device drivers on your computer, do the following:
1. Open the Start menu, select Control Panel, and then select System.
2. On the Hardware tab, click Device Manager.
3. In the Device Manager window, look for the following items:
* Items that are marked with red exclamation marks: This implies that the device is not working.
* Items that are marked with yellow question marks: This indicates that Windows is using a generic driver for the device instead of the device-specific driver.
Quite often, you can resolve the problem by updating
The real name of this virus is Iddono. This threat copies its file(s) to your hard disk. Its typical file name is Iddono. Then it creates new startup key with name Iddono and value newfolder.exe. You can also find it in your processes list with name newfolder.exe or Iddono.This virus is very difficult to eliminate manually, but you can find solution for removal below.
Manual Solution:
Step1:
1. Search for autorun.inf file. It is a read only file so you will have to change it to normal by right clicking the file , selecting the properties and un-check the read only option
2. Open the file in notepad and delete everything and save the file.
3. Now change the file status back to read only mode so that the virus could not get access again.
4. Autorun
5. Click start->run and type msconfig and click ok
6. Go to startup tab look for regsvr and uncheck the option click OK.
7. Click on Exit without Restart, cause there are still few things we need to do before we can restart the PC.
8. Now go to control panel -> scheduled tasks, and delete the At1 task listed there.
Step2:
1. Click on start -> run and type gpedit.msc and click Ok.
2.
3. If you are Windows XP Home Edition user you might not have gpedit.msc in that case download and install it from Windows XP Home Edition: gpedit.msc and then follow these steps.
4. Go to users configuration->Administrative templates->system
5. Find “prevent access to registry editing tools” and change the option to disable.
6. Opening the gate of castle: Group Edit Policies
7. Once you do this you have registry access back.
Step3:
1. Click on start->run and type regedit and click ok
2. Go to edit->find and start the search for regsvr.exe,
3. Launch the attack in the heart of castle: registry search
4. Delete all the occurrence of regsvr.exe; remember to take a backup before deleting. KEEP IN MIND regsvr32.exe is not to be deleted. Delete regsvr.exe occurrences only.
5. At one ore two places you will find it after explorer.exe in theses cases only delete the regsvr.exe part and not the whole part. E.g. Shell = “Explorer.exe regsvr.exe” the just delete the regsvr.exe and leave the explorer.exe
Step4:
1. Click on start->search->for files and folders.
2. Their click all files and folders
3. Type “*.exe” as filename to search for
4. Click on ‘when was it modified ‘ option and select the specify date option
5. Type from date as 1/31/2008 and also type To date as 1/31/2008
6. Seek and destory enemy soldiers: the search option
7. Now hit search and wait for all the exe’s to show up.
8. Once search is over select all the exe files and shift+delete the files, caution must be taken so that you don’t delete the legitimate exe file that you have installed on 31st January.
9. Also selecting lot of files together might make your computer unresponsive so delete them in small bunches.
10. Also find and delete regsvr.exe, svchost .exe( notice an extra space between the svchost and .exe)
Step5:
1. Now do a cold reboot (ie press the reboot button instead) and you are done
To resolve this issue, open Start menu, select Run, type the following error message, and then press Enter.
C:\windows\inf\unregmp2.exe /UpdateWMP
Performing this task may fix the confusion regarding Media Player version numbers and resolve the error message.At times, an error message similar to the one given below may appear on your computer screen when you try to play a video file on your Media Player:Explorer has caused a problem in wmp.dll.
Configuration does not work
If the file system is fat32, you can boot with a Windows 98 boot disk and do the following.
If the file system is NTFS, boot with the Windows XP CD to recovery console (you will need to know the administrator password) and do the following.
I have been successful in getting windows to boot by just replacing the system file, so you might want to try that first. You may end up having to re-install a few programs after the boot is successful
If the copying in the system file does not work, then do these
Won't Boot
#1: Use a Windows startup disk
One of the first things you should reach for when troubleshooting a Windows XP boot problem is a Windows startup disk. This floppy disk can come in handy if the problem is being caused when either the startup record for the active partition or the files that the operating system uses to start Windows have become corrupted.
To create a Windows startup disk, insert a floppy disk into the drive of a similarly configured, working Windows XP system, launch My Computer, right-click the floppy disk icon, and select the Format command from the context menu. When you see the Format dialog box, leave all the default settings as they are and click the Start button. Once the format operation is complete, close the Format dialog box to return to My Computer, double-click the drive C icon to access the root directory, and copy the following three files to the floppy disk:
* Boot.ini
* NTLDR
* Ntdetect.com
After you create the Windows startup disk, insert it into the floppy drive on the afflicted system and press [Ctrl][Alt][Delete] to reboot the computer. When you boot from the Windows startup disk, the computer will bypass the active partition and boot files on the hard disk and attempt to start Windows XP normally.
#2: Use Last Known Good Configuration
You can also try to boot the operating system with the Last Known Good Configuration feature. This feature will allow you to undo any changes that caused problems in the CurrentControlSet registry key, which defines hardware and driver settings. The Last Known Good Configuration feature replaces the contents of the CurrentControlSet registry key with a backup copy that was last used to successfully start up the operating system.
To use the Last Known Good Configuration feature,
Cannot find the file Program_Name.exe.
In the error message Program_Name represents the name of the program or name of one of its components in which the error occurred.
This error message is usually followed by an error message similar to the one given below:
Error starting program. A required .DLL file DLL_Name.DLL was not found.
Here, DLL_Name is the name of the DLL file that is causing the error.
What Causes Missing DLL File Errors?
There can be many causes of missing DLL errors. Some of the most common causes are:
* An essential system file required by the program you are using has been deleted. This may happen when a program is uninstalled/installed or you have tried to clean up space on the hard disk.
* A virus infection has infected the required DLL file.
* DLL entries in the Windows registry are corrupt
How to Fix Missing DLL File Errors
Error 718: the computer you're dialing in to cannot establish a Dial-Up Networking connection.Check your password, and then try again.
Additionally, you may receive the following error message:
Error 718: PPP Timeout A PPP conversation was started, but was terminated because the remote computer did not respond within an appropriate time. This can be caused by poor line quality or by a problem at the server.
Note: Point-to-Point Protocol or PPP is a communication protocol used to establish connection between two computers over a serial interface. Usually, PPP is used to connect a personal computer to a server over a phone line with the help of a serial modem. For example, you may use a PPP connection to dial-in and connect to the server of your Internet Service Provider (ISP).
Causes of Error 178
There are several reasons that may prevent a PPP connection from being established and thus generate a PPP error. Some of the common causes are:
* Bad quality phone line.
* Incorrect phone number is used to dial-in to ISP server.
* Incorrect server type settings on the computer.
* Incorrect username or password being used to establish the connection.
* Malfunctioning ISP server.
* Might need to setup initialization string for the modem to establish a stable connection.
Cause of the Error
There may be several causes of this error. Some the most common ones are given below:
* A third-party program, such as Download Accelerator or Zone Alarm that is not releasing the Winsock stack after performing a particular Internet activity.
* There is a problem with the access numbers of your Internet Server Provider, such as NetZero.
* There is a problem with your modem.
* You are unable to connect your DSL modem through a router, such as a LinkSys router.
Rthdcpl.exe - Illegal System DLL Relocation
The system DLL user32.dll was relocated in memory. The application will not run properly. The relocation occurred because the DLL C:\Windows\System32\Hhctrl.ocx occupied an address range reserved for Windows system DLLs. The vendor supplying the DLL should be contacted for a new DLL.
This error message is displayed when a recent Windows XP update causes some problems with the Realtek HD Audio Control Panel versions1.41, 1.45, 1.49, and 1.57.
Note: You may also encounter this problem if you have ElsterFormular versions 2006 and 2007, TUGZip version 3.4, CD-Tag version 2.27, Suunto Ski Manager versions 1.0.2, 1.1 and 1.2, and BMC PATROL version 7.1 programs on your PC.
Cause of the Error
This problem usually appears after the security updates 925902 (MS07-017) and 928843 (MS07-008) are installed on a Windows XP Service Pack 2 computer. The problem occurs with the program listed above due to conflicting base addresses of the Hhctrl.ocx file included in the security update 928843 and the User32.dll file in security update 925902. The error message is displayed when a program loads the Hhctrl.ocx file before the User32.dll file.
Could not stop the Windows service-name service on Local Computer.
Error 1053: The service did not respond to the start or control request in a timely fashion.
Note: Here, service_name represents that name of the Managed Windows service you are tying to stop or pause.
Cause of the Error
This error usually occurs when there are some problems between the service you are trying to stop/pause and the Advapi32.dll file. This DLL file is part of one of the advanced API services library that supports several APIs that include several security and registry calls.
Technical explanation: When you attempt to stop or pause a service, the OnStop method is directly called by the ServiceBase class directly from the Service common handler. This handler is defined in the ScDispatcherLoop of Advapi32.dll. If this ScDispatcherLoop thread is unable to receive any new service command from the service control manager it is marked as time out and error 1053 is displayed.
"Setup was unable to find the MSI package.“
Steps to See Proxy Configuration
To see if your computer is behind a proxy server, perform the following tasks:
1. Open Internet Explorer.
2. On the Tools menu, select Internet Options.
3. Select Connections.
4. On this tab, select the LAN Settings button to check your Internet Connections settings.
5. If the Use proxy server for this connection check box is selected it implies that you are trying to install your software from behind a proxy server.
One of the first steps in troubleshooting memory-related problems is to ensure that the origin of the problem is really the memory. To do this, you may start by asking the following questions:
1. Have you recently purchased your PC? If the problem is encountered on a new PC, it may be a good idea to contact the vendor for fixing the problem because the system might still be under warranty.
2. Have you upgraded memory by adding new memory chips? Quite often, memory errors occur if we add incompatible or faulty chips. If this is the case, you may resolve the error by replacing the problematic chips. Also, you must ensure that your memory chips are properly seated in their slots.
3. Have you recently installed a new software? If your answer is yes, then it is quite likely that this new software is behind all the errors. In this case, ensure that all the latest updates and patches are installed. At times, problems may occur if the program was not installed properly. If this is the case, then re-installing the software may resolve the error. Also, if you are trying to run a memory-intensive software on an older system, you may face problems. In this case, you may either have to uninstall your software or upgrade your PC.
4. Have you recently installed a new hardware? If a new hardware has been recently installed or removed from the machine, one must check whether there are any loose connections or if the new hardware is working properly.
If the above potential causes have been eliminated, then one must start to investigate the possibility of memory problems. The common symptoms of memory problems and their troubleshooting tips are listed below:
Symptom: Blank Screen
Troubleshooting Tips:
1. Confirm that the VGA card and memory chips are installed properly.
2. Make sure that the motherboard and memory chips are compatible with each other.
Symptom: PC hangs or reboots again
Additional Information: WFP is a feature that helps in protecting Windows operating systems and other program files, usually with file name extensions, .dll, .exe, .ocx, and .sys. Some True Type fonts may also be protected by the feature. Primarily, file signatures and catalog files are used to ensure that the files being protected are correct Microsoft versions. WFP allows these files to be replaced only when a hotfix is installed by using the Update.exe or HOtfix.exe, or if the Operating System is upgraded using Winnt32.exe or a Windows Update is performed.
Cause of the Error
Windows Installers that were released before the version 3.1 allowed the silent installation process to continue even if the software package you were trying to install failed to install a later version of the file that was protected by WFP.
However, this behavior changed with Windows Installer 3.1. If the silent installation process fails to update a file that is protected by WFP, the installation process rolls back.